▷ Best aloe vera plants and supplies 2026
Whether you are buying your first aloe vera plant or replacing a lost one, these three picks cover everything you need: a quality live plant, the right potting mix, and optional aloe vera gel for immediate use while your plant matures.
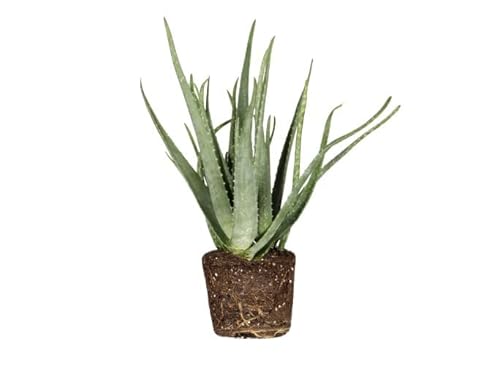
Aloe Vera Live Plant — Aloe Barbadensis Miller, Ready to Use
- ✓ Aloe barbadensis miller — the genuine medicinal variety
- ✓ Mature adult plant ready for immediate leaf harvesting
- ✓ Suitable for indoor and outdoor placement in warm climates
- ✓ Gel-rich leaves harvestable from day one
- ✓ Grown from certified stock — not a decorative-only cultivar
Price from Amazon.com · ships within US
Aloe vera varieties: which one is right for you?
While Aloe vera (Aloe barbadensis miller) is the most common species and the one with documented medicinal properties, the genus Aloe contains over 500 species with varying ornamental value and care requirements. The comparison table below covers the most commonly available types:
| Species / Cultivar | Max Size (indoors) | Medicinal Gel | Light Needs | Best Use |
|---|---|---|---|---|
| Aloe barbadensis miller | 18–24 inches | ✅ Yes — main species | Bright direct/indirect | Medicinal + ornamental |
| Aloe aristata (Lace Aloe) | 6–8 inches | ❌ Minimal | Bright indirect | Small spaces, windowsills |
| Aloe ferox (Cape Aloe) | 3–5 feet | ⚠️ Bitter gel (laxative) | Full sun preferred | Large rooms, outdoor patios |
| Aloe 'Black Gem' (hybrid) | 8–10 inches | ❌ Ornamental only | Bright indirect to direct | Collectors, desktop display |
| Aloe 'Christmas Carol' | 10–12 inches | ❌ Ornamental only | Bright direct recommended | Colorful accent plant (red tips) |
Recommendation: For medicinal purposes, always purchase specifically labeled Aloe barbadensis miller. Generic "aloe vera" plants sold at garden centers are sometimes ornamental hybrids with little or no harvestable gel. For pure ornamental value, the dwarf hybrids are stunning and even lower-maintenance.
Aloe vera complete care guide
Light requirements: bright and direct
Aloe vera is a desert plant that evolved under intense sunlight, and it performs best with as much light as possible indoors. The ideal position is a south-facing window where it receives 6+ hours of direct sun daily. East- and west-facing windows work well too. In low-light conditions, aloe survives but grows very slowly; leaves stretch, lose their compact rosette shape, and the green deepens. If moving an aloe from low light to high light, acclimate gradually over 2–3 weeks to prevent sunburn on the outer leaves (which appears as white or orange bleached patches).
Outdoor placement in summer is highly beneficial for aloe vera: it will grow much faster, produce more pups, and occasionally flower. Bring indoors when temperatures drop below 50°F (10°C). Aloe vera cannot survive frost.
Watering: the soak and dry method
The single most important aloe vera care principle is the soak and dry method: water deeply until water flows freely from the drainage holes, then do not water again until the soil is completely dry at least 2 inches deep. In summer, this means watering every 2–4 weeks; in winter, once every 4–6 weeks or even less. Aloe vera stores water in its thick leaves and can survive months of drought — it cannot survive overwatering.
Signs of overwatering appear faster than drought stress: leaves become soft, translucent, and mushy at the base, then turn yellow-brown and collapse. Signs of underwatering are slower: leaves become slightly wrinkled and thinner as stored moisture depletes, but the plant bounces back rapidly when watered. When in doubt, always wait another week.
Soil and pot: drainage is everything
Aloe vera needs fast-draining soil that does not retain moisture. Use a commercial cactus and succulent potting mix, or amend regular potting soil with 50% coarse perlite or sand. Never use standard potting mix alone — it retains too much moisture. Terracotta pots are the best choice because they are porous and allow the soil to dry faster from all sides. Ensure every pot has drainage holes at the bottom — no drainage hole means root rot is inevitable.

Cactus & Succulent Potting Mix — Fast-Draining Formula for Aloe Vera
- ✓ Ready-to-use cactus and succulent specific mix
- ✓ Optimized drainage — no waterlogging
- ✓ Perlite + coarse sand for ideal aeration
- ✓ Suitable for aloe vera, agave, cacti, and all succulents
Price from Amazon.com · ships within US
Fertilizing aloe vera
Aloe vera is a light feeder that needs little fertilizer compared to most houseplants. In spring and summer, feed once monthly with a balanced liquid fertilizer diluted to half strength, or use a slow-release succulent fertilizer once at the start of the growing season. Do not fertilize in fall and winter when the plant is dormant. Over-fertilizing causes salt buildup in the soil (white crusty deposits on the surface) and can burn the roots, causing browning leaf tips. Aloe vera grown in pure cactus mix in a terracotta pot will deplete nutrients faster than in amended potting soil and may need more consistent light feeding.
How to harvest and use aloe vera gel
Harvesting aloe vera gel is straightforward but should be done correctly to maximize quality and plant health:
- Select the right leaf: choose an outer, mature leaf at least 4–5 inches long and 1 inch thick at the base. Never take more than 2–3 leaves at a time and never remove inner young leaves.
- Cut cleanly: use a sharp, sterile knife and cut close to the base. Serrated knives crush tissue; a clean blade preserves gel quality.
- Drain the latex: stand the cut leaf upright in a glass for 10–15 minutes. The yellow-tinged aloin (latex) that drips out is a potent laxative and skin irritant — remove it completely before use.
- Extract the gel: lay the leaf flat, slice off the serrated edges, peel away one flat side of green skin, and scoop out the clear gel with a spoon.
- Store properly: use fresh gel immediately for best potency, or refrigerate in an airtight container for up to 1 week. For longer storage, blend with a drop of vitamin E oil and freeze in ice cube trays for up to 6 months.
Evidence-based uses for aloe vera gel: sunburn relief and wound healing (strongest evidence), moisturizing dry and sensitive skin, reducing inflammation from psoriasis plaques, soothing insect bites, and as a hair mask for dry scalp. The gel is generally very safe topically, but a patch test is recommended for sensitive skin.
Propagating aloe vera from pups
Aloe vera reproduces naturally by producing basal offsets (pups) — small rosettes that sprout from the root system around the mother plant. Pups should be separated when they are at least one-third the size of the mother plant and have their own leaves and roots:
- Remove the mother plant from its pot and gently brush soil away from the roots to see where the pup is attached.
- If the pup has its own root system, separate it by hand or with a clean sharp knife. If it has no roots yet, cut it away and allow the cut end to callus for 2–3 days before potting.
- Plant the pup in a small pot with fresh cactus mix. Do not water for the first 1–2 weeks to encourage root development.
- Place in bright indirect light for the first month, then gradually introduce to full sun conditions.

Liquid Succulent & Cactus Fertilizer — Balanced Formula for Aloe Vera
- ✓ Balanced NPK formulation for succulents and aloe
- ✓ Liquid concentrate — dilute for gentle monthly feeding
- ✓ Promotes healthy gel production and pup development
- ✓ Suitable for all aloe species and succulent types
Price from Amazon.com · ships within US
Common aloe vera problems and solutions
| Problem | Likely Cause | Solution |
|---|---|---|
| Leaves mushy and brown at base | Root rot from overwatering | Unpot, remove rotted roots, dry for 2–3 days, repot in fresh dry cactus mix |
| Leaves pale yellow-green | Too much direct sun (sun scorch) | Move to bright indirect light; acclimate slowly when returning to direct sun |
| Brown tips on leaves | Fluoride/chlorine in tap water or underwatering | Switch to filtered or distilled water; water more frequently in summer |
| Leaves wrinkled and thin | Underwatering — stored moisture depleted | Water thoroughly; plant will recover within 1–2 weeks |
| Leggy stretched growth | Insufficient light | Move to a sunnier location or add a grow light 12–16 hours/day |
| White crusty deposits on soil | Salt buildup from fertilizer or hard water | Flush soil thoroughly with filtered water; reduce fertilizer frequency |
| Small bugs on leaves or soil | Mealybugs or fungus gnats | Wipe mealybugs with 70% isopropyl alcohol; let soil dry out completely to eliminate fungus gnats |