Best artificial grass 2026: top picks
These are the highest-rated models this year, selected for their quality-to-price ratio and combination of density, natural appearance and durability.
Artificial Grass Turf 20mm — Patio & Balcony Roll
- ✓ 20mm pile height — low-maintenance for patios and balconies
- ✓ UV-resistant polyethylene fibers, all-weather use
- ✓ Perforated latex backing for drainage
- ✓ Sold by the meter — cut to any size
Price from Amazon.com · ships within US
Premium Artificial Grass 30mm — High-Density Realistic Turf
- ✓ 30mm ultra-realistic 4-tone pile for natural appearance
- ✓ 15,000 stitches/m² high-density backing
- ✓ Latex perforated base with drainage holes
- ✓ UV-resistant and high-traffic resistant
Price from Amazon.com · ships within US
Artificial Grass Roll 30mm — 4-Tone Natural Green
- ✓ 30mm pile with 4-color blend for natural look
- ✓ 2m wide roll, cut to measure
- ✓ Durable latex backing
- ✓ Suitable for outdoor and indoor use
Price from Amazon.com · ships within US
Types of artificial grass: pile height, density and fiber
The three main factors that determine quality are pile height, density (stitches per square meter), and fiber type. Understanding them helps you match the product to your specific use case.
Short pile (15-25mm): patios and balconies
15-25mm mats are most used on balconies, apartment patios and decorative indoor areas. Their short pile gives them a more uniform appearance and they are easier to clean. Being thinner, they weigh less and are more manageable to install without help. The main downside is that frequent foot traffic flattens them faster, as there is less pile to spring back.
For small balconies or low-traffic areas, a density of 20,000-25,000 stitches/m² is sufficient. If you have pets, look for models with a porous backing to help liquids drain through.
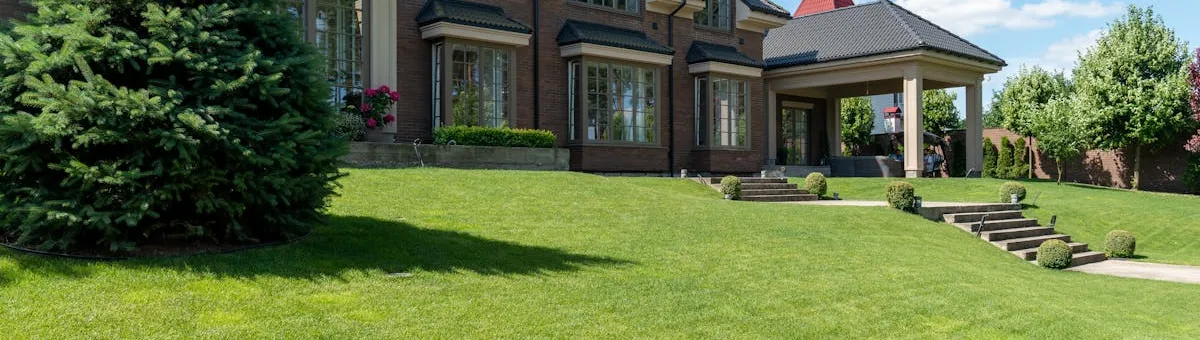
Long pile (30-40mm): natural-looking garden
The 30-40mm range is the closest to a natural grass appearance. The best models blend fibers in different shades of green (bright, dark, lime, straw) to simulate the color variations of real grass. Densities of 35,000-45,000 stitches/m² give a plush underfoot feel and a lush appearance.
Monofilament fibers (individual straight fiber) look the most realistic but bend under foot traffic and take longer to spring back than curled or twisted fibers (W-shape, C-shape). The best solutions mix both: straight monofilament for appearance and curled for resilience.
Sports turf: maximum traffic resistance
For intensive use (children's play, dogs, sports), sport-grade turf with 30-35mm pile and 40,000+ stitches/m² is the right choice. It is made with thicker polyethylene and enhanced UV treatment. It typically requires infill (silica sand or recycled rubber granulate) that keeps the fibers upright and absorbs impact.
Artificial grass comparison by use case
| Use Case | Pile Height | Density | Fiber Type | Infill Needed | Approx. Cost |
|---|---|---|---|---|---|
| Balcony/Patio | 15-20mm | 20,000-25,000/m² | Monofilament | No | $1.50-$2.50/sq ft |
| Decorative Garden | 30-35mm | 35,000-40,000/m² | Monofilament + curled | Optional | $2.50-$4.00/sq ft |
| High-Traffic Family Lawn | 30-40mm | 40,000-45,000/m² | Mixed fiber | Yes (5kg/m²) | $3.00-$5.00/sq ft |
| Pet Play Area | 30-35mm | 40,000+/m² | Twisted fiber | Yes (rubberized) | $3.50-$5.50/sq ft |
| Sports/Professional | 35-45mm | 50,000+/m² | Multi-fiber system | Yes (specialized) | $5.00-$10.00+/sq ft |
Artificial vs natural grass: pros and cons
The debate is real and has no universal answer — it depends on your specific situation. Understanding the full trade-offs helps you decide whether artificial turf will genuinely improve your life or represent wasted money.
Advantages of artificial grass: zero watering (significant saving in areas with water restrictions or expensive water bills—potentially $800-1,200/year in warm climates), no mowing (never needs cutting, saves time and equipment cost), works in shaded areas where natural grass won't grow, no mud or puddles after rain (clean surface immediately), very low maintenance after installation (occasional brushing and debris removal), completely pet-friendly with no dead spots from urine (though odor control requires enzyme cleaner), and unaffected by foot traffic, pests, or disease.
Disadvantages: higher upfront installation cost ($4-10/sq ft = $4,000-10,000 for a 1,000 sq ft lawn), high surface temperature in summer (up to 140-160°F / 60-70°C in direct sun—uncomfortably hot for barefoot walking), does not absorb CO₂ or improve air quality like living plants, appearance becomes less fresh over years without regular brushing (fibers flatten in high-traffic areas), creates a non-living landscape (some homeowners find this psychologically unsatisfying), and has a limited lifespan (10-15 years typical, then full replacement). Also, some municipalities restrict artificial grass on environmental grounds or require permits.
Climate considerations: In dry, hot regions (Southwest USA, California), artificial grass saves tremendous water and looks acceptable year-round. In cold climates with snow and ice, artificial turf remains green under snow but becomes slippery in icy conditions—a safety liability. In moderate climates with adequate rainfall, the cost-benefit shifts heavily toward natural grass.
Who is it the best option for? People with little time for yard work, gardens in drought-stricken areas, terraces and balconies (where real grass struggles), second-home owners who aren't present enough to maintain natural grass, areas where natural grass fails due to deep shade or very intensive use (commercial play areas, dog parks), and anyone willing to spend $4,000-10,000 upfront to eliminate lawn maintenance forever. It's NOT a good option for budget-conscious homeowners, families with young children and limited resources, or anyone in cold/snowy climates where ice hazards outweigh benefits.
---How to install artificial grass: step by step
Good installation is 80% of the result. The most common problem with artificial turf is not the product itself but a poorly prepared base that retains water or settles unevenly over time.
Base preparation: the most important step
Step 1 — Remove existing grass or soil: excavate 3-4 inches deep. If there are weed roots, apply a total herbicide (glyphosate) 2-3 weeks in advance so they don't sprout under the artificial turf.
Step 2 — Drainage gravel layer: lay 2-3 inches of compacted crushed aggregate (0-20mm gravel) and compact it well. This layer ensures water does not pool under the turf. On decks with existing drainage, skip this step if the slope is already correct.
Step 3 — Geotextile membrane: lay a 100-150g/m² geotextile over the gravel. It stops weeds from pushing through the artificial turf and aids drainage.
Step 4 — Cut and position the roll: unroll in the correct direction (all fibers angled the same way, oriented toward the main viewing point). Cut with a box cutter and metal straightedge.
Laying the roll and fixing it down
If joining multiple pieces, use artificial grass joining tape and special adhesive on the back side. Seams are invisible if the fibers are aligned correctly. At the edges, hammer galvanized steel staples every 8-12 inches or use an aluminum edge strip. On terraces where anchoring is not possible, the weight of the roll and the sand infill are sufficient.
Sand infill: spread 3-5 kg/m² of washed silica sand (0.3-0.8mm grain size) with a stiff brush, distributing it evenly between the fibers. Infill keeps the fibers upright, adds weight to prevent movement and improves underfoot feel.
---Artificial grass maintenance: dos and don'ts
Brushing (every 2-3 months): use a stiff-bristled brush (not metal) to lift fibers flattened by use. Brush against the natural lean of the pile. This is the most important step for maintaining a natural appearance.
Leaf and debris removal: rake with a plastic rake or use a leaf blower. Do not use metal rakes that can snag and tear fibers. Wet leaves left under the turf promote mold growth.
Stains: most clean up with water and a little mild dish soap. Pet urine stains require an enzyme-based cleaner to neutralize odor. Rinse thoroughly afterward.
What NOT to do: don't use herbicides or harsh chemicals, don't place barbecues or direct heat sources on the turf (it melts the fibers), and don't cut or scrape the backing.
---Artificial Grass Quality Guide: Pile Height, Density and Fiber Type
Not all artificial grass is created equal. The visible difference between a €5/m² budget roll and a €25/m² premium installation is dramatic—and the performance gap is even larger. Understanding the key quality metrics helps you choose the right product for your needs and expected lifespan.
Pile height (yarn height): This is the length of the grass fibers from the backing to the tip. Typical ranges are 30 mm (short, dense) to 60+ mm (long, natural-looking). Shorter piles (30–40 mm) are durable for high-traffic areas and require less maintenance. Longer piles (50–60 mm) look more natural and feel softer underfoot but flatten more easily under use. For a family garden with regular foot traffic, 40–50 mm is the sweet spot. For a decorative, low-use feature garden, 55–60 mm gives the most realistic appearance.
Pile density (stitches per meter or face weight): Density refers to how tightly the fibers are packed. Premium grass has 14,000–18,000 stitches/m² (or 3.5–5.0 kg/m² face weight), while budget grass has 8,000–12,000 stitches/m². Denser grass recovers faster when compressed (you can stand on it and the fibers bounce back), resists matting, and lasts 10–15 years. Sparse grass looks thin after 2–3 seasons and may show the backing. A simple test: press your finger into the pile for 5 seconds, then release. Premium grass bounces back within 1–2 seconds; budget grass may leave an indent that lasts 10+ seconds.
Fiber type: Most artificial grass uses one of three fiber materials:
- Polypropylene (PP): Budget-friendly (€5–10/m²), soft feel, but degrades in intense UV sun. Lifespan 3–5 years in sunny climates. Best for shaded areas or coastal regions with less intense sun.
- Polyethylene (PE): Premium standard (€12–20/m²), excellent UV resistance, natural appearance, softer than PP. Lifespan 8–12 years. Most "realistic" looking grass uses PE fibers.
- Nylon: Professional-grade (€20–35/m²), highest durability and UV resistance, very soft but slower to dry. Lifespan 12–15+ years. Used in sports fields and high-traffic public areas. Overkill for residential use.
Cost-to-lifespan analysis: A €6/m² polypropylene grass on a 50 m² terrace costs €300 but lasts 4 years = €75/year. A €16/m² polyethylene grass costs €800 but lasts 12 years = €67/year—essentially the same annual cost, but with better appearance and less frequent replacement hassle. Premium pays for itself.
Installation Step-by-Step: Getting It Right the First Time
Improper installation is the leading cause of artificial grass failure. Shortcuts during installation compound over years and lead to seam separation, wrinkles, and drainage problems. Here's the professional protocol:
Step 1: Site preparation (2–3 days) Remove all existing grass, weeds, and roots. This is not optional—grass underneath will decompose and create voids. Level the ground to within 1–2 cm across the entire area. A level surface prevents water pooling and ensures the infill distributes evenly. Use a laser level or a straight board and spirit level for accuracy.
Step 2: Base layer (1 day) Lay 5–10 cm of compacted MOT (mineral aggregate) or recycled asphalt. Compact it with a hand tamper or plate compactor. This base provides drainage, prevents subsidence, and creates a stable foundation. Without this step, soft ground causes the grass to shift and seams to open. For existing hard surfaces (concrete, paving), you can skip the base—the surface is already stable.
Step 3: Geotextile membrane (optional but recommended) Lay a geotextile (landscape fabric) to prevent sand infill from mixing with the base and to block weed growth. This extends the grass lifespan by 2–3 years. Staple it down every 1 meter along edges.
Step 4: Grass laying and joining (2–3 days for 100+ m²) Roll out the grass, allowing a 2–3 cm overhang at all edges. For seams between multiple rolls, use joining tape on the underside and apply a two-part polyurethane adhesive. Press the seam together for 10 minutes. Clean seams with a stiff brush so fibers align and hide the join. Seams should be invisible after brushing if aligned correctly.
Step 5: Edging and securing (1 day) Trim excess grass at edges with a sharp knife. For terrace edges, use aluminum profile strips or galvanized steel edging. Fasten with stainless steel bolts and rivets (not screws, which loosen over time). Hammer galvanized staples along gravel edges every 8–12 inches. Do not skimp on edge security—wind and foot traffic are constant forces that will lift unsecured edges.
Step 6: Infill application (2–3 hours for 100 m²) Spread 3–5 kg/m² of washed silica sand (0.3–0.8 mm grain size) evenly with a stiff brush, working it down between the fibers. This step is critical: proper infill keeps fibers upright, prevents movement, and provides drainage. Under-infilling (< 2 kg/m²) results in fibers flopping over. Over-infilling (> 6 kg/m²) creates a hard, uncomfortable surface.
Common installation mistakes:
- Skipping the base layer—leads to subsidence, pooling, and wrinkles within 2 years.
- Uneven leveling—causes water to pool in low spots and grass to wrinkle in high spots.
- Weak seam joining—seams separate and open within 6 months under foot traffic.
- Loose edges—wind and water get under the edges, lifting the grass.
- Uneven infill—causes bald patches (over-filled) and matting (under-filled).
Real-World Maintenance Costs: What to Budget
Artificial grass is often promoted as "maintenance-free," but that's a myth. It requires less maintenance than natural grass (no mowing, watering, or fertilizing), but brushing, infill replacement, and repairs are necessary for longevity. Here's what realistic owners should budget:
Initial installation cost (50 m² residential garden):
- Budget grass (PP, €6/m²): €300 grass + €150 base + €100 labor (DIY) = €550 total
- Premium grass (PE, €16/m²): €800 grass + €200 base + €300 professional labor = €1,300 total
Annual maintenance cost (budget):
- Brushing tools (one-time): €30 stiff-bristle brush
- Leaf removal: 4–6 hours labor/year (DIY) or €80–120 (professional rake/blower service)
- Stain cleaning: €0–20 (soap and water unless pet urine = enzyme cleaner €15–25)
- **Total annual: €20–40 (DIY) or €100–150 (professional)**
Infill replacement (every 3–5 years):
- Sand infill depletes through foot traffic, drainage, and raking. When the grass feels hard and fibers are visibly flattened, it's time to top up or fully refresh.
- Cost: €1–2/m² for infill material + labor. For 50 m²: €50–100 material + €100–150 labor = €150–250 every 4 years ≈ €40/year
Repairs (seam separation, tears):
- Seam tape and adhesive (DIY): €30–50 and 2 hours labor
- Fiber snags or small tears: can be ignored if cosmetic; if they progress, require professional patching (€200–400)
- Full replacement (expected after 10–15 years): same cost as initial installation
15-year cost comparison (per m²):
- Budget PP grass: €6 installation + €0.27/year maintenance × 15 years = €6 + €4 = €10/m² total (but replace at year 5 = €16/m² every 5 years)
- Premium PE grass: €16 installation + €1/year maintenance + €8 infill refresh (one time at year 7) = €16 + €15 + €8 = €39/m² over 15 years (one 15-year lifespan)
- Verdict: Premium grass has higher upfront cost but lower total cost of ownership and fewer replacement cycles